Instructions
When you run it, FSPViewer shows an empty window: select the File/Open menu command or press the Open button in the toolbar to open a panorama. The program can open JPEG images, TIFF images or *.FSV control files that are described below. You can open a file by dragging and dropping it to the FSPViewer window, too.
You can navigate in an image by dragging the mouse or pressing the arrow keys. Press the A key or the SHIFT key to zoom in, press the Z key or the CONTROL key to zoom out. You can also use the mousewheel for zooming. In the lower part of the window there is a status bar: it will show the current zoom factor and the horizontal and vertical fields of view. A zoom factor of 100% means that you are viewing the panorama at the same size of the panoramic image. A zoom factor less than 100% means that you are viewing a smaller image, a zoom factor higher than 100% means that tour are viewing a bigger image: of course you will start losing details.
You can move as you want in the panorama: as soon as you stay still, the viewer computes a high quality image using an interpolator and draws it on the screen. This image does not have jagged edges and other artifacts: it is relatively slow to compute, so it is not shown while panning in order to give you a smooth movement. As far as I know, no other viewers use such high quality interpolators.
The View menu contains commands that will show or hide the toolbar and the status bar.
- The View/Previous Image command shows the previous image in the folder that contains the current image.
- The View/Next Image command shows the next image in the folder that contains the current image.
- The View/Hotspots command shows the hotspots. This command is only enabled if the current panorama has defined some hotspots.
- The View/Hotspots List… command will open a dialog box with the list of the hotspots defined for the current panorama. You can select an hotspot and press OK (you can also double click the hotspot name in the list) and the viewer will change direction of view so that the selected hospot will be in the center of the window. This command is only enabled if the current panorama has defined some hotspots.
- The View/Full Screen command shows the panorama at full screen: you will only see the panorama, without window borders or taskbar. Press ESC or any other unused key to return to windowed mode. You can also press the F key to enter full screen mode.
- The View/Grid command shows a configurable grid over the panoramic image. It can be useful to check a panoramic image after its creation. More information are available below, in the Program options section.
- The Help/Test Speed command will display some continuous frames to test the speed of the computer.
The Tools menu contains the Set View Parameters command that can be used to manually enter a value for yaw, pitch and horizontal field of view: you can use it to direct the viewer to a given direction. There is also a button to set the current parameters as default: they will be used to open new images.
Program options
It is possible to set various program options using the standard menu entry for each operating system:
- Linux: menu Edit/Preferences
- OS X: standard Preferences menu
- Windows: menu Tools/Options
The options window contains a number of tabs in the upper part. Click a tab to show the corresponding options.
General
In this tab you can set the default horizontal field of view, yaw and pitch values: those values will be used when you open an image. They can be overridden by a command line switch or by the content of the .FSV file (see below).
This tab also contains an option to show the current values of yaw and pitch in the status bar.
Starting from version 2.2 there are two options to handle the panning mode when using the mouse:
-
when Auto panning (VR standard) is selected just drag a little with the mouse and the image will keep panning until you release it. This is the mode used by previous versions.
-
when Click and drag (GSV-like) is selected just drag with the mouse and the image will follow: you need to move the mouse the pan the image. Googe Street View works in this way.
The Mouse sensitivity slider is available only if you selected the Auto panning (VR standard) option: if it is set to a lower value panning will be slower, if it is set to a higher value panning will be faster.
If Check For Updates is selected the program will query the website to know if a new version is available.
Grid
FSPViewer can show a grid over the panoramic image using the View/Grid menu command or a toolbar button. The grid can be useful to check a panoramic image after its creation. The grid is drawn over the underlying panoramic image, so all horizontal lines, except for the horizon, become curved, but they still join all the points that have the same height over the horizon. Vertical lines are almost never rendered vertical but they remain straight lines.
The following configuration parameters are available:
-
Grid lines width is the width of the grid lines in pixels. This is the width in the underlying image. The size on the screen depends on the zoom factor. With larger images the grid lines will appear narrower.
-
Check the Show rows check button tho show the grid rows. The horizon line is always visible.
-
You can choose the Row distance (in degrees) among horizontal lines.
-
Check the Show columns check button tho show the grid columns.
-
You can choose the Columns distance (in degrees) among vertical lines.
Color
Images usually contain an embedded ICC color profile that must be used to render colors correctly. If the profile is ignored some images (especially those that use the Prophoto color space) could show very wrong colors.
Select Enable color management to let FSPViewer convert colors from the image color profile to the monitor one, assuring greater color fidelity. This options requires some computing power so image loading might take a little longer.
If color management is enabled you have two choices for the monitor profile:
- Use sRGB profile will convert colors to the standard sRGB color space. Most monitors’ color rendering is similar to this profile. Choose this option (it is the default) if you do not have a custom profile for your monitor.
- Use profile from file will use a custom profile for your monitor. You must select the profile file that will be used. You can choose this option if you have created a profile for your monitor: the colors will be more accurate.
Advanced
In this tab you can select the number of threads that will be used when computing frames. The default is 4, but you can try 16 if you have a modern CPU. More threads usually yield smoother panning.
Interpolators
This tab will let you set the quality level of the interpolators. Interpolators are used to compute frames from the panoramic image.
Better interpolators are slower so FSPViewer uses a lower quality interpolator when panning so that panning will be as smooth as possible. As soon as you stop panning the program will compute and show a higher quality frame.
The Interpolator group lets you choose the quality of the steady image, when the user is not panning. You should choose Lanczos3 that creates the highest quality images.
The Interpolator (when panning) group lets the user choose the quality of the frames that are generated while panning. Since panning requires a fast computation of each frame there are no higher quality options that are too slow:
- None does not use any interpolator: it simply takes a single pixel in the base image. This is the fastest option so panning is smoother, but if you are panning very slowly you can often see a “shimmering” effect. This happens more often if the zoom factor is less than 100%.
- Bilinear creates a better quality image. This option greatly reduces the “shimmering” effect, but it is slower so panning is not so smooth.
- Auto uses the “bilinear” setting when you are panning slowly to avoid the “shimmering” effect, and it uses the “none” setting when you are panning faster so that the viewer is more responsive. This should be the best option for most users.
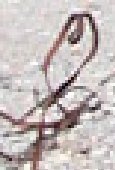
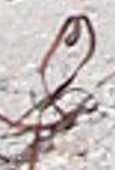
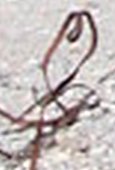
An example
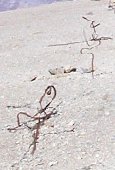
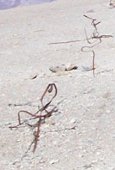
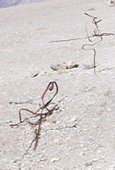
Here is an example of the result of the various interpolator options. The image represents some rusted iron bars: it has been chosen because its sharp edges make clear the difference. The following images are part of screenshots taken at a zoom level of 87%
 |
 |
 |
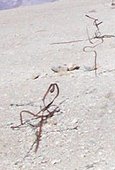 |
| No interpolator | Bilinear | Lanczos2 | Lanczos3 |
As you can see, without interpolation the lines are jagged and distorted but the image looks sharp. This is why many people prefer this setting to bilinear. Bilinear interpolation renders smooth edges but creates a blurred image. Lanczos interpolators render smooth edges and sharp images. This is a very good result, but it has a very high computing cost: only modern computers can compute it fast enough to use it an almost real-time application.
Here’s the same image, part of screenshots taken at a zoom level of 300%, to make the difference easier to notice:
 |
 |
 |
 |
| No interpolator | Bilinear | Lanczos2 | Lanczos3 |
FSV control files
FSPViewer can directly open the JPEG or TIFF image file of the panorama, but you may want to use more advanced features, such as hotspots. In order to use these features you must supply more information to the program. This is accomplished by writing a control file for each panoramic image.
The control file has a default extension of *.FSV ad is a text file written according to some guidelines.
Each line contains a key and a value, separated by an equal sign (=), without spaces. The keys are not case sensitive, so you can mix upper and lower case letters as you like. The keys are:
| KEY | Meaning |
| ImageName=name of the image file | specifies the name of the JPEG or TIFF file to open. |
| WindowTitle=window text | specifies the text to be written in the title bar of the window. |
| Yaw=initial yaw value | specifies the initial value for the yaw angle (default 180°) |
| Pitch=initial pitch value | specifies the initial value for the pitch angle (default 0°) |
| hFov=initial hFov value | specifies the initial value for the horizontal field of view (default 70°, maximum value 140°) |
| MinYaw=minimum yaw value | specifies the minimum value of the yaw (horizontal) angle. It can be used to limit the movement in the left direction. |
| MaxYaw=maximum yaw value | specifies the maximum value of the yaw (horizontal) angle. It can be used to limit the movement in the right direction. |
| MinPitch=minimum pitch value | specifies the minimum value of the pitch (vertical) angle. It can be used to limit the movement in the down direction. |
| MaxPitch=maximum pitch value | specifies the maximum value of the pitch (vertical) angle. It can be used to limit the movement in the up direction. |
| AutoSpin=angle to add | used for autorotation of the panorama. The specifed value is added to yaw angle for each frame. Positive numers rotate to the right, negative numers rotate to the left. Since the drawing of each frame is very fast you will probably need small values. You can use decimal numbers. |
| HorizonPosition=nn | used if the horizon is not in the middle of the pano image. Without this parameter FSPViewer would show a curved horizon. The parameter is a % value of the image height, measured from the top. The default value is 50 and the horizon is considered to be in the middle of the image. If the value is less than 50 the horizon is nearer to the top of the image, if it is greater than 50 the horizon is nearer to the bottom of the image. For example, if you have a pano 1150 pixels high and the horizon is 430 pixels from the top then the parameter value is 430/1150*100 = 37. You must use an integer value, without decimals. |
| //comment | every line starting with two slashes is a comment: the program ignores it and can be used as a reference for future readers |
All the keys are optional except for the first, that is mandatory (of course…). All numeric values can have fractional values, the decimal separator must always be a period (not a comma). For example, the following file: ImageName=photo.jpg WindowTitle=An example panorama will tell FSPViewer to open a file named “photo.jpg” and to display the text “An example panorama” in the title bar of the window. Note that you must not write spaces before ad after the “=” sign.
Yaw and pitch
A full spherical panoramic image represents the whole view from a point, in any direction. Here is the structure of the image:
As you can see, the yaw is the horizontal angle, from left to right. Its values are between 0° (left border) and 360° (right border). The pitch is the vertical angle, from bottom to top. Its values are between -90° (straight bottom) and +90° (straight top). The horizontal direction has a pitch of 0°. If you load such an image in FSPViewer you will be able to look in any direction. These images always have an height that is half their width.
Partial panoramic images
Creating a full panoramic image is a complex task and it usually limits you to relatively low resolution. Moreover, in many cases, such as landscape images, there is not much interest in shooting at you feet.
For these (and other) reasons you may have an image that is only partial, i.e. it will not show every direction.
Most often you will have an image that is limited in the pitch angle: the yaw value will still go to from 0° to 360° while the pitch range will not go from -90° to +90° but will lie in a smaller range. For example, stitching together some photographs taken with a 28mm lens (35mm equivalent) in portrait mode will yield to a pitch range of about -30°..+30°.
FSPViewer will handle these images without problems: it will make the assumption that the horizon lies in the center of the image and it will compute the maximum pitch value from the image size. If the horizon does not lie in the center of the image you can use an FSV control file with the “HorizonPosition” parameter to show the panorama with the correct perspective. Without that parameter FSPViewer would show a curved horizon.
You may have images with a limited yaw range (less than 360°): you will not be able to directly open them with FSPViewer, since the program expects a full 360° yaw range. You can solve the problem in the following way: create a monochrome (black, for example) image of the right size for a full 360° image, than paste the partial panorama inside the black image, in the correct position. Your original image will be surrounded by black areas but the program will now be able to open it. Now you can use the MinYaw and MaxYaw parameters of the FSV file to limit the horizontal view so that the black areas will not be visible.
Hotspots
A typical feature of viewers are hotspots: an hotspot is a portion of a panorama that can be clicked to open another panorama. With FSPViewer you can define hotspots inside the FSV control file. You can specify the viewing direction and angle of view of the opened panorama, in order to create immersive virtual tours.
Each hotspot is defined by a number of consecutive lines in the FSV file. The first line must be “BEGIN HOTSPOT” and the last must be “END HOTSPOT”. The other lines contain key-value pairs as stated below. The keys are:
| KEY | Meaning |
| X=x coordinate | specifies the x coordinate of the hotspot. It
is computed as the absolute x coordinate of the pixel divided by the width
of the image and multiplied by 100. The resulting value will be between 0
and 100. This may seem complicated, but the result will not change as you
resize the image. The decimal separator must always be a period (not a comma). |
| Y=y coordinate | specifies the y coordinate of the hotspot. It is computed as the x coordinate |
| Description=hotspot description | specifies a description of the hotspot to be shown in the status bar |
| Target=JPEG, TIFF or FSV file | specifies the name of the file to be opened when clicking the hotspot |
| InitialYaw=yaw angle | specifies the yaw (horizontal angle) for the opened panorama. It must be between 0 and 360. |
| InitialPitch=pitch angle | specifies the pitch (vertical angle) for the opened panorama. It must be between -90 and 90. |
| InitialHFov=field of view | specifies the horizontal field of view for the opened panorama. It is an angle and must be less than 70 degrees. |
To improve readability you can indent the lines between “begin hotspot” and “end hotspot”. For example, an hotspot definition can be as follows:
begin hotspot
x=12.25
y=48.02
description=A new panorama
target=pano2.fsv
initialYaw=231.34
initialPitch=4.2
initialHFov=45.0
end hotspot
How to compute InitialYaw and InitialPitch
In order to compute these values you need to open the target panorama with an image editor and take note of the coordinates of the point where you want to look.
InitialYaw is simpler: just multiply the x coordinate by 360 and divide by the width of the image. You will obtain a number between 0 and 360.
InitialPitch is a little harder: let w be the width of the image, h its height, y the y coordinate of the point.
Then
InitalPitch = 90*(h/2 - y)/(w/4).
You will obtain a number between -90 and 90: negative values mean “look down”, positive values mean “look up”. You can create an Excel worksheet to automate the computations.
Command line switches
You can use some switches in the command line that starts FSPViewer. The complete syntax is:
FSPViewer imagename -s -y=nn -p=nn -hf=nn -hson -top=nn -left=nn -width=nn -height=nn
| Switch | Meaning |
| imagename | specifies the name of the image file to be opened. |
| -s | will make the File Open dialog box show .FSV files by default instead of JPEG files. It can be useful if you have a folder or CD containing many .FSV files: the users will immediately see the right files. |
| -y=nn | specifies the initial yaw value. nn must be an integer number. |
| -p=nn | specifies the initial pitch value. nn must be an integer number. |
| -hf=nn | specifies the initial hFov value. nn must be an integer number. |
| -hson | shows the panoramic image with hotspost enabled. |
| -top=nn | specifies the y coordinate of the top border of the window, in pixels. |
| -left=nn | specifies the x coordinate of the left border of the window, in pixels.. |
| -width=nn | specifies the width of the window, in pixels. |
| -height=nn | specifies the height of the window, in pixels. |
| -fs | if the command line contains a filename FSPViewer will start in full-screen mode. If the command line does not contain a filename the viewer will go to full-screen mode as soon as a file is opened. |
All the four “top”, “left”, “width” and “height” switches must be present, otherwise they will be ignored.
The switch letters are not case sensitive. All switches are optional. The switch character can be either “-“ or “/”.
Here are some example command lines:
FSPViewer MyImage.jpg -s -y=30 -p=-10 -hf=80
FSPViewer MyImage.jpg -hson -top=0 -left=0 -width=600 -height=400
How to create a CD with panoramic images
You can create a CD to show your panoramic images to other people using FSPViewer. The CD will not require installation and it will work on every computer.
Simply copy the program (the FSPviewer App for Mac OS X, the FSPViewer32 executable for Linux and Windows) and your panoramic images to a CD. It is better to use JPEG images than TIFF ones. TIFF images are so large that loading them from a CD takes a much longer time. To see the panoramic images just run FSPViewer and open the desired file.
For Windows you can create an autostart CD that will automatically open a panoramic image when inserted in a computer. Just add to the CD a text file named “AUTORUN.INF” containing the following three lines:
[autorun]
OPEN=FSPViewer32.exe PanoImage.jpg
ICON=FSPViewer32.exe,0
Where “PanoImage.jpg” is the name of one of your panoramic images.
If you are using “*.fsv” control files the autorun.inf file could look like
[autorun]
OPEN=FSPViewer32.exe PanoImage.fsv -s
ICON=FSPViewer32.exe,0
The “-s” switch forces FSPViewer to show “*.fsv” files in the file open dialog, so users will not open the underlying jpeg files losing the information contained in the control file.